server-configuration
How To Install And Configure Nginx On Your Linux Server
Install Nginx on Ubuntu, open the firewall, and confirm the welcome page—step by step, with copy-paste commands and quick checks along the way.
 Shashikant Dwivedi

This guide walks you through installing Nginx on an Ubuntu server, allowing HTTP through the firewall, and confirming everything in the browser. Work through the steps in order; each block tells you why you are running a command, not only what to paste.
Only need the commands? Use the snippet Nginx on Ubuntu — install and firewall commands — one copy-paste block, no explanations.
At a glance: the five moves
- Refresh system packages.
- Install the
nginxpackage.- Allow Nginx Full in UFW (ports 80 and 443).
- Confirm the service is active (running).
- Open your server’s public IP in a browser and see the default welcome page.
What you will accomplish
By the end you will have:
- A running Nginx web server listening on the usual HTTP port.
- UFW rules so browsers can reach Nginx from the internet (for typical cloud setups).
- A simple sanity check: the default Nginx page loads when you visit the server’s public IP.
Before you start
- Ubuntu (or another Debian-based distro using
apt). The commands below target Ubuntu; other families use different package managers (see the expandable note below). - SSH access with
sudo(for example, an EC2 instance and its public IP). - Optional but useful: note your instance’s public IPv4 from the cloud console before you open the browser test.
Firewall reality check
If you use a cloud security group (AWS, GCP, Azure, etc.), inbound TCP 80 (and 443 if you add TLS later) must be allowed there as well. UFW on the VM and the cloud firewall both need to permit traffic, or the browser test will fail even when Nginx is fine.
Not on Ubuntu? (RHEL, Fedora, Amazon Linux)
Rough equivalents:
- RHEL / Rocky / Alma (dnf):
sudo dnf install nginxthensudo systemctl enable --now nginx- Amazon Linux 2 (yum):
sudo amazon-linux-extras install nginx1or use thenginxpackage from your AMI’s repos, thensudo systemctl enable --now nginxFirewall tools differ (
firewalld,iptables, or only cloud SGs). Allow HTTP/HTTPS the way your distro documents.
What is Nginx?
Nginx is open-source software often used as a web server or reverse proxy. It serves static files efficiently and sits in front of app servers in many production stacks.
Learn more (official and docs)
- Project home: nginx.org
- Admin guide: nginx documentation
Step-by-step installation
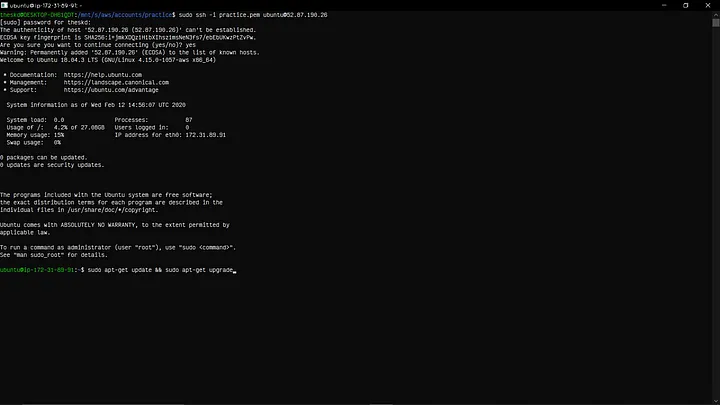
Step 1 — Update packages
Refreshing the package index (and upgrading installed packages) reduces “weird install” issues from stale metadata.
sudo apt-get update && sudo apt-get upgrade
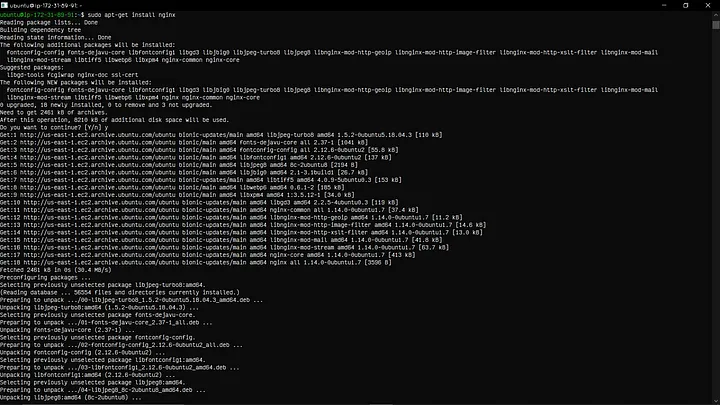
Step 2 — Install Nginx
This installs the server binary, default site config, and systemd service.
sudo apt install nginx
Step 3 — Allow Nginx through UFW
ufw is Ubuntu’s friendly front end to the firewall. Nginx Full opens 80 (HTTP) and 443 (HTTPS), which saves you a second pass when you later add TLS.
sudo ufw app list
sudo ufw allow 'Nginx Full'
If you only want HTTP for now, you can use sudo ufw allow 'Nginx HTTP' instead.

Step 4 — Check that Nginx is running
systemctl status shows whether the unit is active, recent log lines, and whether it will start on boot.
sudo systemctl status nginx
What “good” looks like
You want Active: active (running) in green. If you see failed or inactive, scroll the status output for errors, or run
journalctl -u nginx -e --no-pagerfor the full service log.

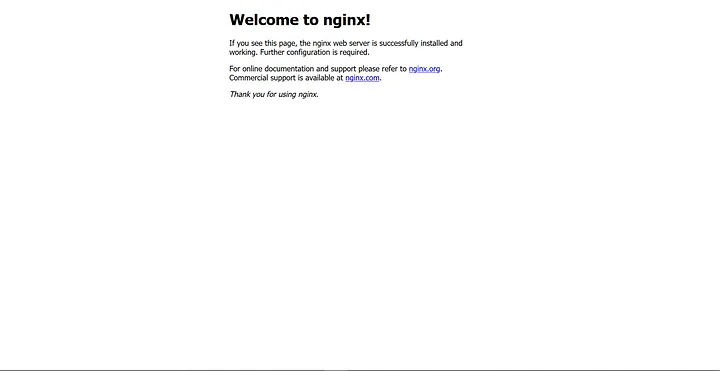
Verify in the browser
- Copy your server’s public IP from your cloud provider (or run
curl -4 ifconfig.mefrom the server if outbound HTTP is allowed). - Paste it into a browser address bar (
http://YOUR_IP).
You should see the default “Welcome to nginx!” page served from /var/www/html (default install).
What next?
- TLS: Once you have a domain pointing at this server, follow a Let’s Encrypt workflow—for example the Certbot + Nginx guide on this site.
- Real sites: Add a
server { ... }block (or a file insites-available) for your domain and reload Nginx. - Troubleshooting:
sudo nginx -tvalidates config before reload; checkerror.logunder/var/log/nginx/if something refuses to start.
If you hit a snag, note your Ubuntu version, the exact systemctl status line, and any nginx -t output—that makes it much easier to narrow down.
Written by Shashikant Dwivedi
Engineer, occasional writer, full-time noticer. Based in Prayagraj, India. New essays land roughly twice a month.
Keep reading
Adjacent essays.

Setting Up Nginx as a Reverse Proxy - The Easy Way! 🚀
Learn how to easily connect your web app to a domain name using Nginx as a reverse proxy. A beginner-friendly guide with ready-to-use configs! 🚀
Read article

Configuring Apache on an AWS Ubuntu Instance: Installation Guide
This comprehensive, step-by-step guide teaches you how to install and configure Apache on an AWS Ubuntu instance. It is perfect for developers and system administrators looking to optimize their Linux server setup.
Read article